Last updated: September 18, 2026
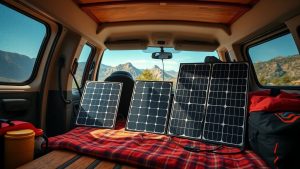
Dust, road film, bird droppings, pollen, and tree sap can block sunlight from reaching your van’s solar cells. Cleaning solar panels on a van the wrong way can be just as harmful: a pressure washer may drive water beneath seals, a rough sponge can scratch the glass, and cold water on a hot panel can create thermal shock. You can usually do the job safely in 20 to 40 minutes with a few basic supplies. This guide explains how to clean solar panels on a van without damaging the panels, roof, wiring, or charge controller.
Quick answer: Our top pick in 2026 is the Soft microfiber cloths — our #1 rated choice. See the full ranked comparison, alternatives and buying advice below.
What You Need
| Item | Why | Optional? |
|---|---|---|
| Soft microfiber cloths | Lift dust and loosen grime without scratching tempered glass | No |
| Soft-bristle brush with a long handle | Reaches roof-mounted panels while you stay on the ground or a ladder | Yes |
| Garden hose with a gentle spray | Rinses away loose dirt and soap | Yes |
| Distilled or deionized water | Reduces mineral spots, especially in hard-water areas | Yes |
| Small bucket | Holds clean water and a mild cleaning solution | No |
| pH-neutral dish soap | Breaks up oily road film without harsh chemicals | Yes |
| Non-slip footwear and a stable ladder | Reduces the risk of a fall around a tall van | No |
| Work gloves and safety glasses | Protect hands and eyes from dirt, debris, and cleaning solution | Yes |
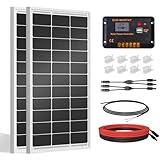
Use only a small amount of soap: about 1 teaspoon per gallon of water. Avoid abrasive powders, glass cleaner containing ammonia, bleach, solvents, wax, and stiff scrub pads. If you are shopping for a replacement or new van system, common choices include a 200-watt monocrystalline kit priced around $200 to $250, such as the ECO-WORTHY 200 Watts 12V/24V kit listed at $219.99, or a two-panel system priced around $300 to $400, such as the Callsun N-Type 16BB 400W bifacial setup listed at $345.99. Cleaning requirements are generally similar, but always follow the panel maker’s instructions.
As an Amazon Associate we earn from qualifying purchases at no extra cost to you. Product prices and availability are accurate as of the date shown and are subject to change.

Step-by-Step
See also: How to Set Up Van Solar Panels (2026): Step-by-Step • How Much Battery Capacity for Van Solar? Size Guide With Measurements (2026)
Choose a cool, calm time of day (5 minutes)
Clean the panels early in the morning, late in the afternoon, or on an overcast day. The glass can become hot enough in direct sun to evaporate water before you rinse it away. A cool surface helps prevent streaks and thermal stress. Park the van on level ground, engage the parking brake, and keep the work area clear of overhead branches and traffic.
Inspect the panels and make the system safe (5 minutes)
Look for cracked glass, loose mounting hardware, lifted edges, damaged cable insulation, and water inside junction boxes. Do not wash a panel with exposed conductors or obvious electrical damage. Turn off interior loads, then follow the charge-controller manufacturer’s shutdown sequence. In many van systems, the solar or PV input is disconnected before the battery connection, but the correct order varies. Never unplug connectors while standing in water or while the system is under load.
Remember that panels can produce electricity whenever light reaches them, even when the controller is turned off. Covering a panel is not a substitute for safe electrical isolation.
Remove loose dust and grit (3 minutes)
Use a soft brush or a gentle hose spray to remove sand, leaves, and loose grit. Work from the top edge toward the bottom edge. Do not drag dry dirt across the glass with a dry cloth; those particles can act like sandpaper. If the roof is too high to reach safely, use a telescoping wash brush from the ground rather than climbing onto the panel or roof.
Wash with clean water and mild soap (5 to 10 minutes)
Fill a bucket with one gallon of cool water and add roughly 1 teaspoon of pH-neutral dish soap. Dip a microfiber cloth or soft-bristle brush into the solution and wring it out so it is damp, not dripping. Gently clean in straight passes, starting at the highest point and working downward. Give bird droppings and dried sap a few minutes to soften; do not scrape them with a knife, razor, credit card, or metal tool.
Keep water away from roof vents, cable glands, controller compartments, and open connectors. A properly installed panel can tolerate rain, but directed water can enter places that normal rainfall does not reach.
Rinse thoroughly (3 to 5 minutes)
Rinse until no soap or loosened dirt remains. A normal garden hose on a gentle fan setting is sufficient. Do not use a pressure washer, which can damage seals and force water under the panel frame. If your tap water is hard, make the final rinse with distilled or deionized water to reduce white mineral spots.
Dry and check the surface (5 minutes)
Use a clean microfiber towel or a soft rubber squeegee to remove standing water. Use light pressure and keep the squeegee blade free of grit. Inspect the glass from several angles for streaks, cloudy patches, chips, or new cracks. Also check that mounting brackets have not shifted and that cables remain clipped above the roof rather than rubbing against an edge.
Restore power and monitor output (2 to 5 minutes)
Reconnect the system in the sequence specified by the controller or installer. Confirm that the controller shows solar input and that the battery is charging under suitable sunlight. Do not judge performance immediately if the day is cloudy, the battery is already full, or the panels are shaded. A clean surface should look uniformly clear, but cleaning alone cannot fix a faulty controller, damaged cell, or deep shade.
Mistakes to Avoid
- Cleaning hot glass with cold water, which can increase thermal stress and leave streaks.
- Using a pressure washer, abrasive sponge, razor, squeegee with a gritty blade, or stiff household brush.
- Walking directly on flexible panels or standing on rigid panels unless the manufacturer specifically permits it.
- Spraying upward into connectors, junction boxes, roof penetrations, vents, or cable glands.
- Using bleach, ammonia, solvent, degreaser, powdered cleanser, wax, or automotive polish.
- Disconnecting solar connectors in bright sunlight or with wet hands.
- Assuming a drop in power is caused by dirt when the real issue is shade, a loose connection, a failing battery, or a damaged controller.
How Often
For most vans, inspect the panels every month and clean them about every three to six months. Clean more often if you drive on dusty roads, park beneath trees, travel near the coast, or see bird droppings and sticky sap. In dry, dusty regions, a light rinse every four to eight weeks may be useful. After pollen season, wildfire smoke, construction travel, or a long storage period, inspect the surface before relying on the system for extended off-grid use.
Do not clean solely by calendar. If the panels look clear and the electrical system is producing normally, frequent washing is unnecessary. Heavy deposits are more important than a thin layer of ordinary dust.
When to Call a Pro or Replace
Call a qualified solar or RV technician if you find cracked glass, burn marks, melted connectors, loose roof penetrations, frayed cables, repeated controller faults, or moisture inside an electrical enclosure. Professional help is also wise if reaching the roof requires an unstable ladder or if the panels are bonded directly to the roof and you suspect water intrusion.
Cleaning will not restore a panel with delamination, bubbling, widespread discoloration, or a permanently damaged cell. Consider replacement when the panel has structural damage, no longer produces useful power after wiring and controller checks, or costs more to repair than a comparable replacement. Before buying, match the system voltage, connector type, panel dimensions, mounting method, and controller capacity. A higher-wattage panel is not automatically compatible with an existing charge controller.
FAQ
Can I clean van solar panels with tap water?
Yes, tap water is suitable for washing and rinsing. If your water is hard, dry the panels promptly or use distilled water for the final rinse. This helps prevent mineral deposits that can leave a cloudy film.
Should I turn off solar panels before cleaning?
Follow the charge-controller instructions and isolate the system as directed. Panels still generate electricity in daylight, even when the controller is switched off. Never disconnect live connectors, and keep hands and plugs dry.
Can rain clean solar panels well enough?
Rain can remove loose dust but often leaves behind pollen, bird residue, road film, and mineral spots. A gentle hand wash is more effective when the panels have visible grime or when charging performance has changed without another clear cause.
How do I clean panels that I cannot safely reach?
Use a soft telescoping brush and gentle hose spray from the ground, or hire an RV, solar, or mobile-detailing professional. Never climb onto a wet van roof, lean an unsecured ladder against a fragile panel, or use a pressure washer from below.
Ready to decide? Our #1 pick for 2026 is the Soft microfiber cloths.
Live price & availability on Amazon.