Last updated: September 18, 2026
The Short Answer
For a typical 200-watt solar panel on a camper van, use 10 AWG solar cable for most installations. A 200W panel usually produces about 10 to 11 amps at its maximum-power voltage, commonly around 18 to 22 volts. Ten-gauge copper PV wire keeps voltage loss low on short and medium cable runs while remaining flexible enough for roof and interior routing.
Use 8 AWG when the one-way distance from the panel to the charge controller is more than about 25 feet (7.6 meters), when the system operates at 12 volts, or when you want to limit voltage drop to approximately 2% or less. For the short battery-side connection between a 12V charge controller and battery, 8 AWG is often the better choice because charging current can approach 17 amps from a 200W array.
As an Amazon Associate we earn from qualifying purchases at no extra cost to you. Product prices and availability are accurate as of the date shown and are subject to change.


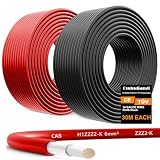
Measure cable length as the complete circuit: panel to controller and controller back to panel. A 10-foot one-way route is a 20-foot round-trip circuit. Select cable rated for outdoor solar use, with tinned copper conductors, UV-resistant insulation, and connectors compatible with the panel leads. In 2026, common retail prices for 10 AWG solar wire range from about $100 to $210 for 200 to 400 feet, while a 200W panel commonly costs about $150 to $250.
Standard Sizes
See also: How to Clean Solar Panels on Van (2026): Step-by-Step • How to Set Up Van Solar Panels (2026): Step-by-Step
The table below compares practical wire choices for a 200W van solar system. Conductor diameter is the bare copper measurement; finished cable will be larger because of insulation. The recommended distances assume copper cable, a 12V battery system, and a 20-foot round-trip circuit unless otherwise noted.
| Wire size | Bare conductor diameter | Diameter in centimeters | Typical use for 200W solar | Suggested one-way run |
|---|---|---|---|---|
| 12 AWG | 0.0808 in | 0.205 cm | Very short panel leads | Up to 10 ft (3.0 m) |
| 10 AWG | 0.1019 in | 0.259 cm | Standard roof-to-controller cable | Up to 25 ft (7.6 m) |
| 8 AWG | 0.1285 in | 0.326 cm | Long runs and battery-side wiring | About 25 to 40 ft (7.6 to 12.2 m) |
| 6 AWG | 0.1620 in | 0.411 cm | Extra-long or higher-current systems | More than 40 ft (12.2 m) |
These conductor measurements describe American Wire Gauge sizes, not the outside diameter of the finished cable. Insulated 10 AWG PV wire may measure roughly 0.25 to 0.35 inches (0.64 to 0.89 cm) across, depending on the insulation and manufacturer. Check the product specification before drilling holes or selecting cable glands.
Do not confuse a panel’s maximum series fuse rating with the wire size. A 200W panel may list a maximum fuse around 15 amps, but the wire still needs to be selected according to current, distance, installation method, and acceptable voltage drop. Use PV-rated cable on the roof rather than ordinary household electrical wire.
How to Measure Your Space
- Mark the panel location. Measure from the point where the panel leads exit the roof to the planned entry gland. Leave enough room for a gentle bend rather than forcing the cable into a sharp corner.
- Measure the roof route. Follow the actual path around roof accessories, vents, racks, and sealant areas. A straight-line measurement will usually be too short.
- Measure the interior route. From the roof gland, trace the cable to the charge controller. Include cabinets, wall cavities, and any required service loop.
- Measure the controller-to-battery run separately. This section carries charging current at approximately battery voltage, so it may need a larger wire than the panel-to-controller section.
- Double the one-way distance. Add the positive and negative conductors to calculate the round-trip length used for voltage-drop estimates.
- Add an allowance. Add at least 10% to 20% for bends, slack, stripping, and future service. For example, a measured 18-foot route should usually be purchased as a 20- to 25-foot run per conductor.
For a 200W panel producing approximately 11 amps, 10 AWG copper is a sensible choice for a 10-foot one-way run. If the route is 30 feet one way, choose 8 AWG or move the controller closer to the battery and keep the higher-current battery cable short. Positioning the controller near the battery often saves more space and cable cost than simply buying a very large wire.
By Room or Use Case
Roof to a nearby charge controller
Use 10 AWG solar cable when the controller is within about 10 to 20 feet of the roof entry point. This is the most common van layout. Keep both conductors the same gauge, secure the cable every 12 to 18 inches, and protect it from roof edges, standing water, and abrasion. Use a properly sealed entry gland and avoid leaving connectors where water can collect.
Roof to a controller in a rear cabinet
A rear cabinet may create a 20- to 30-foot one-way route after the cable travels around the ceiling and interior panels. Ten AWG may work at the shorter end, but 8 AWG is preferable when the round-trip distance exceeds about 50 feet. The larger cable reduces voltage loss and gives the controller a more accurate panel reading.
Controller to a 12V battery
The battery-side cable should generally be 8 AWG for a 200W array, particularly when the controller is a few feet from the battery. At 12 to 14 volts, a 200W system can deliver roughly 14 to 17 amps after conversion. Keep this run short, install the manufacturer-specified fuse close to the battery, and follow the charge controller’s terminal size limits.
Small roof panels wired in parallel
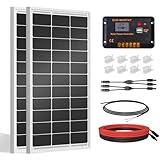
Two 100W panels wired in parallel still produce about 200W, but their current adds together while voltage remains similar. Use branch connectors rated for the panel current and 10 AWG trunk cable. Confirm that the charge controller accepts the combined short-circuit current and that each panel has compatible voltage and connector polarity.
Portable or temporary solar setup
A portable 200W panel may need a detachable cable that is repeatedly coiled and uncoiled. Ten AWG flexible PV cable is a practical baseline for short distances. If the portable panel sits 25 feet or more from the van, use 8 AWG where the connectors and controller terminals can accept it. Avoid sharply folding the cable, which can damage the conductor or insulation.
Common Sizing Mistakes
- Choosing wire by wattage alone: Wire size depends on current and distance. A 200W panel at 20 volts has a different current requirement than a 200W device at 120 volts.
- Measuring only one conductor: Voltage drop occurs across the complete positive-and-negative circuit. Always use round-trip length.
- Using automotive wire outdoors: Standard automotive cable may not have the UV, moisture, and temperature resistance required on a van roof. Use PV-rated wire.
- Using a small battery cable: The controller-to-battery section can carry more current than the panel side. Size it separately and install overcurrent protection.
- Mixing gauges without checking terminals: A larger 8 AWG cable is not useful if the connector, fuse holder, or controller terminal is rated only for 10 or 12 AWG.
- Buying only the exact measured length: Cable needs slack for routing, stripping, connector installation, and future repairs. Add 10% to 20% before ordering.
FAQ
Is 10 AWG enough for a 200W solar panel?
Yes. Ten AWG is the standard practical choice for most 200W van solar installations, especially when the one-way panel-to-controller distance is 25 feet or less. Use 8 AWG for longer routes or when minimizing voltage drop is a priority.
Can I use 12 AWG wire for 200 watts?
You can use 12 AWG for a very short run, such as a factory panel lead or a route of approximately 10 feet one way. For a typical roof-to-controller installation, 10 AWG provides a better margin and lower voltage loss.
How much solar wire should I buy?
Measure the positive route and negative route separately, add both lengths, then add 10% to 20% for slack. A 15-foot one-way route usually requires at least 33 to 36 feet of total cable, divided into one positive and one negative conductor.
Are expensive solar wires necessary for a van?
The most important features are the correct AWG size, copper conductors, PV rating, UV-resistant insulation, and compatible connectors. Example 10 AWG products may cost roughly $104 to $206 depending on whether the package contains 200 or 400 feet. Pay for verified construction and the right length rather than branding alone.
Ready to decide? Our #1 pick for 2026 is the 12 AWG.
Live price & availability on Amazon.