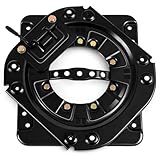
- Top Pick: CCNLHZM FTP004 Swivel Seat Base Right Passenger Side
- Best Value: Woanger 360° Rotating Seat Swivel Base Plate, Heavy Duty 3mm Steel Seat Swivel Mount, DIY Installation Rotation Adapter for Rv, Camper Van, Bus, Truck & Custom Vehicle Projects (New Version Style)
- Premium Choice: Seat Swivel Base 360° Rotating Mount | Heavy Duty Steel Van & RV Turntable, Adjustable 0°-360° Rotation with 4 Lock Points, Smooth Edges, Easy Installation for Driver, Passenger, Rear Seats

TL;DR: A swivel seat base turns your cab seats into a living room — critical for small vans where the front seats double as seating. Installation takes 2–4 hours. Key factors: floor plate compatibility with your van model, swivel range (180° vs. 360°), and weight rating matching your seat. Most fit Transit, Sprinter, and Promaster with model-specific adapter plates.
Swivel Seat Base for Camper Van: Full Installation Guide + Best Picks (2026)
Swivel seat bases are one of the highest ROI upgrades in any van conversion. In a 144″ Sprinter or Transit, getting 18–24 square feet back by making front seats face the living area changes how the whole build functions. This guide covers the complete installation process, common failure points, and which bases actually work long-term.
As an Amazon Associate we earn from qualifying purchases.



🛒 Best Price Today on Amazon
Prime members get fast, free shipping on everything above, plus member-only deals. New members get a 30-day free trial — cancel anytime.
Start 30-Day Prime Free Trial →See Today’s Amazon DealsTop Picks at a Glance


As an Amazon Associate we earn from qualifying purchases. Product prices and availability are accurate as of the date/time indicated.

WAYSKA Diesel Heater 12V, 5L Tank, Diesel Heater 2KW, Muffler, Diesel Parking Heater with LCD Monitor & Remote Control for Trucks, Trailer, Boat and Motor-Home


As an Amazon Associate we earn from qualifying purchases. Product prices and availability are accurate as of the date/time indicated.


As an Amazon Associate we earn from qualifying purchases. Product prices and availability are accurate as of the date/time indicated.
Why Swivel Seat Bases Matter in Van Builds
See also: Best Black Friday Ride-On Toy Deals • Best Telescopes for Astrophotography
Most van conversions under 170″ wheelbase face the same constraint: the living area is too short for a comfortable couch and a full dinette. Installing swivel bases on the driver and passenger seats solves this without adding square footage. With both seats rotated 180° and a table mounted between them, you have a four-person dining area that costs nothing in floor space. This single upgrade can eliminate the need for a separate seating area — a major win in compact builds.
The swivel question is closely tied to your overall layout. If you’re running a see best 12v lifepo4 battery 100ah under the driver’s seat, verify clearance before purchasing — some swivel bases add 1.5–2.5″ of height and may conflict with underfloor storage.
Types of Swivel Seat Bases
180° Manual Swivel Bases
The most common type for van conversions. A lever or button releases the rotation lock; you swing the seat to face rearward, then re-lock. Typically 20–30 lbs steel construction, rated 300–400 lbs. No electronics. Easy to install, zero maintenance. The downside: most 180° bases include a forward-offset design that pushes the seat slightly forward when swiveled rearward — measure your steering wheel clearance before buying.
360° Swivel Bases
Allow full rotation to any position — useful if your build has a side door seating arrangement or a wrap-around bench. Heavier than 180° units and typically add more height. Mechanism is more complex; inspect bearing quality before buying. Cheap 360° swivels develop slop within a year of regular use. Stick to units with sealed bearings and a positive locking detent at each stop position.
Swivel Seat Adapters (Vehicle-Specific)
Some manufacturers sell bases pre-matched to specific van models — Ford Transit (2015+), Mercedes Sprinter (VS30, NCV3), Ram Promaster, VW Crafter. These have pre-drilled holes matching OEM floor mounting points, eliminating custom drilling. Worth the premium: installation time drops from 4 hours to 90 minutes, and structural integrity is better since you’re using factory anchor points.
Compatibility Check: Before You Buy
Swivel seat base compatibility has three dimensions:
- Van model and year — floor mounting patterns differ between generations. A Sprinter NCV3 (2007–2018) has different anchor points than the VS30 (2019+). Always verify.
- Seat rail type — OEM seats slide on specific rail profiles. The swivel base top plate must match your seat rail bottom. Universal bases use adjustable clamps; model-specific bases bolt directly.
- Airbag sensor compatibility — some vans have occupancy sensors in seat rails that trigger airbag behavior. Disconnecting or repositioning these sensors may require a dealer reset. Check your van’s service manual or consult a forum specific to your model before modifying seat mounts.
Step-by-Step Installation Guide
Tools Required
Torque wrench (30–50 ft-lb range), socket set (metric and SAE), trim removal tools, floor jack or transmission jack, Loctite threadlocker (medium strength), and the vehicle service manual for torque specs on seat bolts.
Step 1: Disconnect Battery
Any seat with airbag connections requires battery disconnection before removal. Wait 5 minutes after disconnecting for capacitors to discharge. If your build already has a best 12v lifepo4 battery 100ah, disconnect that too — this work is near electrical runs.
Step 2: Remove OEM Seat
Slide seat fully forward. Access rear mounting bolts (typically 2–4 bolts, 13mm or 16mm). Unplug all electrical connectors — label each with tape before unplugging. Slide seat fully rearward, access front bolts. Lift seat straight up and out. Note: most van seats weigh 40–70 lbs. Have a partner or use a floor jack with a padded top.
Step 3: Install Floor Plate
The swivel base floor plate drops into the original floor mounting positions. For model-specific bases, holes align directly. For universal bases, mark and drill new holes using the floor plate as a template. Apply medium Loctite to all floor bolts. Torque to manufacturer spec — typically 30–45 ft-lb for M10 bolts. Do not overtorque; van floors have captive nuts that strip under excess torque.
Step 4: Attach Top Plate to Seat
Mount the swivel top plate to the seat’s existing rail brackets. Most OEM seats have 4 mounting points on the rail underside. Match the top plate to these points. Again use Loctite and torque to spec. Reconnect all seat electrical connectors — ensure positive click on each connector before proceeding.
Step 5: Join Top and Bottom Plates
Lower the seat assembly onto the floor plate. Engage the swivel mechanism. Test rotation before final installation — seat should rotate smoothly with no binding. Check clearance against door panels, steering wheel, and dashboard at all rotation angles. If the seat contacts any surface, shim the bottom plate or adjust seat position fore/aft before final torque.
Step 6: Reconnect Battery and Test
Reconnect battery. Start vehicle and check for airbag warning lights. Sit in seat, fasten seatbelt, and verify belt pretensioner fires correctly (some vehicles test this on ignition). Test seat adjustment controls. If any warning lights appear, consult a dealer before driving.
Spec Comparison Table
| Spec | Budget Universal | Mid-Range Universal | Model-Specific |
|---|---|---|---|
| Rotation Range | 180° | 180° or 360° | 180° or 360° |
| Weight Rating | 250 lbs | 330 lbs | 350–400 lbs |
| Added Height | 2.5″ | 1.8″ | 1.2–1.5″ |
| Installation Time | 3–5 hours | 2–4 hours | 1–2 hours |
| Airbag Compatible | Check manually | Check manually | Usually yes |
| Construction | Powder coat steel | Powder coat steel | Powder coat / zinc plate |
| Lock Mechanism | Spring pin | Lever lock | Lever lock / positive detent |
| Price Range | $60–$100 | $120–$200 | $180–$350 |
Common Mistakes and How to Avoid Them
- Skipping airbag connector check — always reconnect in original orientation; reversed connectors can disable side airbags silently.
- Not testing rotation clearance pre-installation — mock the rotation angle by holding the seat manually before committing to bolt holes.
- Using the wrong torque — under-torqued floor bolts loosen on rough roads; over-torqued ones strip captive floor nuts that are expensive to repair.
- Ignoring seat height gain — 2.5″ extra height on a driver’s seat changes sightlines and may interfere with headliners or sunroofs. Measure headroom after installation.
If your build includes a more on rv accessories must have with steering wheel desk mount, check clearance between swiveled seat and the desk arm — this combo requires extra planning.
Frequently Asked Questions
Is it safe to drive with a swivel seat base installed?
Yes — when installed correctly and locked in the forward position. The swivel base must be fully locked before driving. Most quality units have a positive-click locking mechanism that prevents accidental rotation. Always verify the lock is engaged before moving. The base adds no meaningful failure risk when torqued to spec on proper anchor points.
Will a swivel seat base void my van warranty?
Possibly for seat-related warranty claims, but not the vehicle as a whole under the Magnuson-Moss Warranty Act (US). The manufacturer must prove the modification caused any failure to deny a warranty claim. That said, if you damage the seat rail or floor anchors during installation, those repairs won’t be covered. Use model-specific bases and follow torque specs to minimize risk.
How much height does a swivel base add?
Typically 1.2″ to 2.5″ depending on the unit. Low-profile bases designed for vans target 1.5″ or less. Measure your current headroom with the seat in driving position, subtract the added height, and verify you still have comfortable driving clearance. This matters most for taller drivers in Transit low-roof or Promaster City builds.
Can I install a swivel seat base myself or do I need a mechanic?
DIY-friendly if you’re comfortable with basic mechanics and have a torque wrench. The airbag wiring is the only genuinely sensitive part — follow disconnect procedures carefully and reconnect in original order. If your van has seat-mounted side airbags (common in newer Sprinters and Transits), have a dealer scan for codes after installation to confirm no faults. Budget 2–4 hours for your first install.
Which vans are swivel seat bases compatible with?
Ford Transit (2015+), Mercedes Sprinter NCV3 (2007–2018) and VS30 (2019+), Ram Promaster (2014+), VW Crafter (2017+), and Fiat Ducato all have model-specific bases available from major suppliers. Universal bases fit a wider range but require more fitment work. Older vans (pre-2007 Sprinter, older Transit Connect) generally use universal bases since model-specific versions aren’t produced.
Making the Most of Your Swivel Seats
Swivel seats only unlock their full potential with the right table setup. A telescoping pedestal table mounted to the floor between the cab seats creates a genuine dinette. Combined with a folding rear bench or the bed base as rear seating, this configuration comfortably seats four for meals. If you’re running a 12V induction cooktop in the galley area, having a proper dinette within reach of the kitchen makes meal service dramatically easier. The swivel seat is the foundation — the table is what activates it.