Last updated: September 18, 2026
Setting up van solar panels can give you quiet, dependable power for lights, phones, a refrigerator, a fan, and other everyday loads without running the engine. Done poorly, however, the system can produce less power than expected, damage batteries, loosen in wind, or create a fire risk through undersized wires and poorly protected connections. A safe installation starts with a realistic power budget, a compatible charge controller, and secure roof hardware—not simply the largest panel that fits.
This guide explains how to set up van solar panels in 2026, using a typical 12-volt system as the example. A 200-watt kit is a practical starting point for many campers, but your actual output depends on weather, shade, panel angle, roof orientation, battery capacity, and how much electricity you use.
As an Amazon Associate we earn from qualifying purchases at no extra cost to you. Product prices and availability are accurate as of the date shown and are subject to change.
Quick answer: Our top pick in 2026 is the Solar panel or 200-watt panel kit — our #1 rated choice. See the full ranked comparison, alternatives and buying advice below.
What You Need
| Item | Why | Optional? |
|---|---|---|
| Solar panel or 200-watt panel kit | Converts sunlight into electricity. A 200-watt setup may produce roughly 600 to 1,000 watt-hours per day in good conditions, but shade and clouds can reduce that substantially. | No |
| 30-amp charge controller | Regulates charging so the solar panel does not overcharge a 12-volt battery. PWM controllers are economical; MPPT controllers generally harvest more energy, especially in cooler weather or with longer cable runs. | No |
| 12-volt deep-cycle battery | Stores energy for nighttime and cloudy periods. A 100Ah lithium battery stores more usable energy than a similarly rated lead-acid battery because it can typically be discharged more deeply. | No |
| Roof mounts, brackets, or adhesive feet | Hold the panel down against wind and vibration. Use hardware approved for your roof material and the panel manufacturer’s instructions. | No |
| Solar cable, cable glands, crimp terminals, and heat-shrink tubing | Connects components while keeping the roof penetration weather-resistant. For a 200-watt, 12-volt system, 10 AWG cable is a common starting point; confirm the required size from cable length and current. | No |
| Fuses or breakers | Protect wires from dangerous overcurrent. Install protection close to the battery and wherever required by the controller or system design. | No |
| Multimeter and cable crimper | Checks polarity and voltage and creates secure electrical connections. | No, but strongly recommended |
| Conduit, loom, sealant, and cable ties | Protects cables from sharp edges, heat, water, and abrasion. | Some are optional, but roof cable protection is strongly recommended |
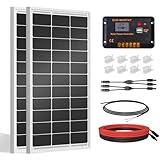
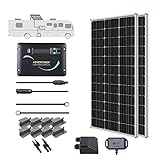
Two common 200-watt reference kits are the ECO-WORTHY 200-watt 12-volt/24-volt kit with a 30A PWM controller, listed at about $219.99, and the Renogy 200W 12V N-Type RV Solar Panel Kit with Adventurer 30A Controller, listed at about $289.99. Kit contents, warranties, controller features, and prices can change, so verify what is included before buying. Neither price necessarily covers battery storage, roof hardware, extra cable, fuses, or installation.
Step-by-Step
See also: How to Clean Solar Panels on Van (2026): Step-by-Step • How Much Battery Capacity for Van Solar? Size Guide With Measurements (2026)
1. Calculate your daily power needs (30–60 minutes)
List every device you expect to run and its wattage. Multiply watts by the number of hours used each day. For example, a 40-watt refrigerator running for an equivalent 10 hours uses about 400 watt-hours. Add lights, phones, a water pump, laptop, fan, and inverter losses. Aim for some spare capacity rather than sizing the system to your exact average.
A 200-watt array produces 200 watts only under ideal test conditions. In real use, plan around a fraction of that rating. If you regularly use an induction cooktop, air conditioner, hair dryer, or electric heater, a basic 200-watt system will usually be insufficient without a much larger battery bank and inverter.
2. Check the roof and plan the layout (30–60 minutes)
Measure the usable roof area, including vents, fans, roof racks, skylights, and the curve of the roof. Leave room for mounting brackets and cable entry. Confirm that the panel will not hit branches or interfere with doors and service access. A roof panel commonly adds roughly 1 to 2 inches of height, depending on the mounts, which matters in garages and parking structures.
Minimize shade. A small shadow from a roof vent can reduce output from a panel, depending on the panel’s internal wiring. Keep panels away from areas where people walk or place cargo.
3. Choose battery and controller compatibility (20–30 minutes)
Match the controller to the battery chemistry: flooded lead-acid, AGM, gel, or lithium batteries require different charging settings. Confirm that the controller supports your battery’s voltage and that its maximum solar input exceeds the array’s operating current. A 30A controller is commonly paired with a 200-watt, 12-volt array, but always check the manufacturer’s voltage and current limits.
Install the battery in a secured, ventilated area as appropriate for its chemistry. Protect it from water, excessive heat, and impact. Do not place an unprotected battery next to loose metal tools or cargo.
4. Mount the panel securely (1–3 hours)
Dry-fit the panel and mark the mounting points. If drilling, check the underside of the roof first for wiring, structural members, and headliner obstructions. Use stainless hardware and backing plates where the roof construction requires them. Tighten fasteners firmly without crushing the panel frame.
Some installations use adhesive mounting feet instead of drilled brackets. Only use a roof-rated adhesive system on a clean, compatible surface, and follow its curing time before driving. Adhesive alone is not a shortcut around proper surface preparation. Seal every roof penetration with a compatible, flexible sealant, then inspect the sealant bead for gaps.
5. Route and protect the solar cables (45–90 minutes)
Keep the positive and negative cables together where practical, and route them away from exhaust components, sharp metal, hinges, and hot engine-bay areas. Use loom or conduit, cable clips, and grommets at every pass-through. Leave a small service loop near the panel and controller, but avoid large coils that can snag or rub.
Before connecting anything, label positive and negative wires. Solar connectors are polarized, but a connector that fits is not proof that polarity is correct. Use a multimeter to verify voltage and polarity.
6. Connect the controller and protection (30–60 minutes)
Turn off or cover the panel before making connections. In most installations, connect the battery to the charge controller first, then connect the solar array, following the controller’s instructions. Install the correctly sized fuse or breaker close to the battery’s positive terminal. Add additional protection if required by the controller manufacturer or local electrical standards.
Do not substitute a random fuse because it is convenient. The fuse must protect the wire, while still allowing the expected operating current. Crimp terminals with the correct tool, tug-test each connection, and cover exposed metal with heat-shrink tubing.
7. Test, label, and monitor the system (30–45 minutes)
Turn on the battery connection and check that the controller recognizes the battery type and voltage. Then uncover the panel or close the disconnect and confirm that solar charging begins in sunlight. Check for reversed polarity, unusual heat, error codes, and loose terminals.
Label the solar disconnect, battery disconnect, fuses, and major cables. Record the installation date, panel wattage, battery type, and controller settings. Monitor performance for the first week, especially after driving on rough roads or through heavy rain.
Mistakes to Avoid
- Ignoring shade: A panel under a vent shadow may deliver far less power than its advertised rating.
- Using undersized cable: Long, thin cable creates voltage drop and heat. Size wire for current and total round-trip length.
- Skipping fuses: A battery can deliver enormous current into a short circuit. Protect the positive cable close to the battery.
- Mixing battery settings: Incorrect lithium or lead-acid settings can shorten battery life or create a safety issue.
- Relying on sealant alone: Sealant is not a substitute for secure mounting, proper cable glands, and a clean roof surface.
- Forgetting height: Measure the finished panel and mount height before entering low-clearance areas.
- Expecting solar to run everything: A 200-watt array is not an unlimited source of power, particularly in winter or cloudy weather.
How Often
Inspect the panel, mounts, sealant, cable glands, and visible wiring every three to six months, and after severe storms or long trips. Wipe off heavy dirt, pollen, bird droppings, and tree sap with water and a soft sponge. Avoid abrasive cleaners. Check controller terminals annually for looseness or corrosion, with the system safely disconnected first. Review daily production and battery behavior whenever your power needs change.
When to Call a Pro or Replace
Call a qualified RV or automotive electrical professional if the system requires a large inverter, multiple batteries, alternator integration, shore-power charging, a custom lithium installation, or extensive roof modifications. Get help immediately if you smell burning insulation, see melted connectors, find a hot cable or fuse, observe battery swelling, or repeatedly trip a breaker.
Replace a panel when its glass is cracked, its frame is bent, water has entered the junction box, or measured output remains abnormally low after checking shade, wiring, and controller settings. Replace damaged cables, connectors, fuses, and roof seals rather than patching them temporarily.
FAQ
How many solar panels do I need for a van?
Start with your energy audit. One 200-watt panel or kit can cover modest needs such as refrigeration, lights, device charging, and a fan when conditions are favorable. Add more capacity if you use a laptop for long periods, have a larger refrigerator, or camp in cloudy climates. Roof space and controller limits may determine whether a second panel is practical.
Can I connect solar panels directly to a van battery?
No. Use a compatible solar charge controller between the panels and battery. Direct connection can overcharge the battery, damage equipment, and create a serious safety hazard.
Should I choose PWM or MPPT?
PWM controllers are often less expensive and can work well with a straightforward, short-cable 12-volt setup. MPPT controllers generally use available panel power more efficiently, particularly when panel voltage is higher than battery voltage, the cable run is long, or conditions are cool. Compare the controller’s supported battery types, input limits, and charging settings—not just its price.
Can solar panels charge while I am driving?
Yes, roof panels can charge while driving if the system is installed and secured correctly. They can also work alongside an alternator charger or shore-power charger, provided the charging devices are compatible and configured for the same battery chemistry. Have a professional review a multi-source charging system if you are unsure.
Ready to decide? Our #1 pick for 2026 is the Solar panel or 200-watt panel kit.
Live price & availability on Amazon.