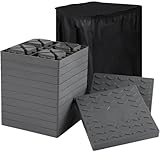
- Top Pick: OULEME 12 Pack RV Leveling Blocks, Stackable Jack Blocks, Interlocking Leveling Pads with Carrying Bag, for Camper Travel Trailer
- Best Value: Camco RV Stabilizing Jack Pads – 4-Pack – Made in the USA
- Premium Choice: BUNKER INDUST RV Leveling Blocks/Stackable Jack Blocks, Interlocking Leveling Pads Wheels Stabilizer Blocks with Bag for Camper Trailer RVs, 10 Pack, Black

Van Leveling Blocks and Jack Pads: Best Options for a Stable Vanlife Setup
TL;DR Quick Answer
Van leveling blocks and jack pads are two different tools that every van build needs. Leveling blocks go under the tires to correct side-to-side and front-to-back slope at a campsite. Jack pads go under a floor jack or bottle jack to distribute weight and prevent the jack from sinking into soft ground. Budget $20–$50 for a quality leveling block set and $15–$30 for jack pads. Combined, they add under 5 lbs to your gear and solve two problems that come up on almost every off-pavement campsite.
Sleeping on a slope ruins a night’s sleep. A 3-way absorption fridge on an unlevel surface stops cooling. A floor jack on soft soil tips and drops your van. All three problems have the same low-tech solution: van leveling blocks and proper jack pads in your kit at all times.
As an Amazon Associate we earn from qualifying purchases at no extra cost to you.




This guide covers the types of leveling systems that work for vans (heavier and taller than cars), jack pad requirements for safe jacking on varied terrain, and the specific products worth carrying in 2026.
🛒 Best Price Today on Amazon
Prime members get fast, free shipping on everything above, plus member-only deals. New members get a 30-day free trial — cancel anytime.
Start 30-Day Prime Free Trial →See Today’s Amazon Deals- Top Picks: Van Leveling Blocks and Jack Pads
- Leveling Blocks vs Ramps: Which Works Better for Vans?
- How Much Leveling Does a Van Actually Need?
- Jack Pads: Why They Matter More Than You Think
- The Complete Leveling and Jacking Kit for Vanlife
- FAQ: Van Leveling Blocks and Jack Pads
- Frequently Asked Questions
- Related Articles
- Related Guides
Top Picks: Van Leveling Blocks and Jack Pads
BEST OVERALL — STACKING BLOCKS
Tri-Leveler Stackable Leveling Blocks (Set of 10)

WAYSKA Diesel Heater 12V, 5L Tank, Diesel Heater 2KW, Muffler, Diesel Parking Heater with LCD Monitor & Remote Control for Trucks, Trailer, Boat and Motor-Home


As an Amazon Associate we earn from qualifying purchases. Product prices and availability are accurate as of the date/time indicated.
BEST RAMP STYLE — GRADUAL RISE
RV Leveling Ramp Chock Combo Set


As an Amazon Associate we earn from qualifying purchases. Product prices and availability are accurate as of the date/time indicated.
BEST JACK PADS — HIGH LOAD
Heavy-Duty Rubber Jack Pad Set for Vans

Ivation Portable Camping Shower | Compact Handheld & Hands-Free Rechargeable Outdoor Shower Head & Cleaning System w/ 3.7V Pump, 6-Ft Hose, Bidet Head, Removable Filter, Multiuse Hook & USB Cable


As an Amazon Associate we earn from qualifying purchases. Product prices and availability are accurate as of the date/time indicated.
Leveling Blocks vs Ramps: Which Works Better for Vans?
See also: Best Ways to Keep a Van Tidy on the Road • Best Cyber Monday Cologne Deals
There are two main leveling approaches, each with trade-offs for van use:
Stackable leveling blocks are interlocking plastic blocks (typically 1–2 inches each) that you stack to build a platform of the exact height needed. You drive one or both tires onto the stack. Advantages: precise height adjustment in 1-inch increments, compact storage, and works for any amount of correction. The downside is setup time — you need to estimate height needed, stack appropriately, and may need to adjust after the first attempt.
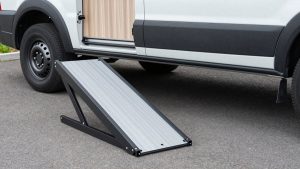
Leveling ramps are wedge-shaped inclines you drive up until the van is level. Simpler and faster to deploy — just place and drive up. The limitation: most ramps have a fixed maximum correction height (typically 4–5 inches), and you cannot fine-tune beyond what the ramp geometry provides.
For vans specifically, stackable blocks are generally superior. A loaded full-size van (Sprinter, Transit, ProMaster) can be 3–6 inches off level on uneven terrain. Ramps max out at 4–5 inches and can’t be combined for more. Stackable blocks handle any correction needed. The extra setup time is worth the flexibility.
How Much Leveling Does a Van Actually Need?
| Slope Angle | Side-to-Side Feel | Front-to-Back Feel | 3-Way Fridge Impact |
|---|---|---|---|
| 0–1° | Undetectable | Undetectable | None |
| 1–3° | Barely noticeable | Barely noticeable | Minor performance loss |
| 3–5° | Noticeable when lying down | Mild rolling sensation | Moderate cooling loss |
| 5–8° | Uncomfortable for sleep | Noticeable lean | Significant performance loss |
| 8°+ | Poor sleep quality | Items roll/shift | May stop cooling entirely |
For sleep quality, most people tolerate up to 3° without issue. For 3-way absorption refrigerator performance, keep it within 3° in all directions. Practically, aim to level within 1–2° using your blocks and a small digital level app on your phone (free, accurate to 0.1°).
Note: side-to-side leveling is almost always more important than front-to-back for sleep quality. Most people tolerate slight head-up or head-down inclines much better than sleeping on a lean. Prioritize side leveling first.
Jack Pads: Why They Matter More Than You Think
A loaded cargo van weighs 6,000–8,500 lbs. A standard 3-ton floor jack concentrated on a small pad has 600–800 PSI of contact pressure. On asphalt in summer heat, that jack will sink. On packed dirt, it will shift. On soft ground, it will go all the way in and drop the van.
Jack pads — thick rubber or UHMW polyethylene plates — distribute the jack load over a larger area, lowering contact pressure to safe levels and preventing the jack from tipping on uneven surfaces. For a van, jack pads serve two roles:
- Under the floor jack foot: Distributes load, prevents sinking into soft soil or hot asphalt. A 12-inch square pad reduces contact pressure from 600 PSI to under 50 PSI.
- Under the jack stand: Same principle — jack stands have small feet that concentrate load. Pads under each stand foot prevent shift and settling during extended work under the van.


As an Amazon Associate we earn from qualifying purchases. Product prices and availability are accurate as of the date/time indicated.
Material matters for jack pads. Rubber is heavy and durable, good for shop use. UHMW polyethylene is lighter and performs better on soft terrain. Avoid wooden boards — they split under point loads and absorb moisture, becoming slippery and weakening over time. Dedicated polymer jack pads weigh 1–2 lbs each and last indefinitely.
The Complete Leveling and Jacking Kit for Vanlife
A complete kit that handles all situations vanlifers encounter:
- 10-piece stackable leveling block set — handles up to 5 inches of correction per tire, interlock for stability
- 2x wheel chocks — prevent the van from rolling while on blocks or during jacking. Non-negotiable safety item. Many block sets include these.
- 2–4x jack pads — one under the floor jack, one under each jack stand in use
- Digital level app or small bubble level — confirm level before settling in rather than guessing
- 3-ton floor jack or 2-ton bottle jack — appropriate for van weight. Never use a 1.5-ton car jack on a loaded van.
Total weight for blocks + chocks + pads: approximately 8–12 lbs. Store in a mesh bag or milk crate in the rear cargo area. They stack compactly and are worth every pound for the comfort and safety they provide on every trip off pavement.
For complete roadside preparedness, pair your leveling kit with a portable air compressor and a vanlife fire extinguisher — together these three items handle the most common non-mechanical roadside situations a vanlifer faces.
WAYSKA Diesel Heater 12V, 5L Tank, Diesel Heater 2KW, Muffler, Diesel Parking Heater with LCD Monitor & Remote Control for Trucks, Trailer, Boat and Motor-Home
As an Amazon Associate we earn from qualifying purchases. Product prices and availability are accurate as of the date/time indicated.
FAQ: Van Leveling Blocks and Jack Pads
How many leveling blocks do I need for a full-size van?
A 10-piece set of standard stackable blocks (each block adds 1–1.5 inches) provides up to 5–7 inches of correction per tire, which covers virtually any campsite leveling scenario. Most sites need 3–5 blocks per side. The set of 10 allows you to level both driver and passenger side simultaneously if needed. For most van builds, 10 blocks is the right quantity — more than enough for side leveling and occasional front-to-back correction.
Can I use leveling blocks on soft ground or grass?
Yes, with one caveat: stacked plastic blocks on soft ground can shift or sink slightly under van weight. On soft grass or loose soil, place the blocks on a firm base — a piece of plywood or a dedicated UHMW base plate distributes the tire load over more surface area. Some block sets include large base plates for this purpose. In very soft conditions (wet soil, sand), spreading the load is more important than the leveling blocks themselves.
What jack is safe to use on a loaded van?
Use a minimum 3-ton (6,000 lb) floor jack for a loaded full-size cargo van. Most full-size vans (Sprinter, Transit, ProMaster) have a GVWR of 8,550–11,030 lbs — you’re lifting one corner at a time, so roughly 25–30% of total weight per jack point, but safety margin matters. A 3-ton jack with a 6-ton jack stand provides appropriate safety margin. Never use a scissor jack rated for a passenger car on a commercial van. Always use jack stands after lifting — never work under a van supported only by a jack.
Do I need to level my van if I only use a compressor fridge?
For fridge operation, no — 12V compressor fridges work at any angle. But leveling still matters for sleep quality, and for anything liquid that needs to sit flat (cooking, dishes in a drying rack, water in a kettle on a stove). Most vanlifers level regardless of fridge type simply because sleeping on a lean is uncomfortable. The real question is how precisely level — for compressor fridge users, 3–5° is acceptable; for 3-way absorption fridge users, aim for 1–3°.
How do I know how many blocks to stack before driving onto them?
Use a digital level app on your phone placed on a flat interior surface (countertop, floor) to measure current slope before setting up blocks. Each block adds approximately 1–1.5 inches of height. Divide the slope correction needed (in inches at the tire contact patch, which is roughly wheelbase × tan of slope angle) by your block height to estimate starting stack depth. Then drive up slowly and recheck. With practice, most vanlifers can estimate correctly on the first attempt within one block’s margin.
Frequently Asked Questions
How much weight can plastic leveling blocks take?
Quality interlocking blocks are rated around 3,500-4,000 pounds per stack, which covers a single wheel on most vans and small RVs. Cheap thin blocks crack under a loaded Sprinter, especially on hot asphalt. Spread the load across two blocks side by side if your axle weight is near the limit.
How many blocks do I need to level a van?
Each block adds roughly one inch of lift and one degree of correction on a typical wheelbase. Most campsites need two to three inches, so a ten-block set is plenty. Carry a small bubble level or use a phone app, and level side to side first, then front to back.
What is a jack pad for and do I need one?
A jack pad spreads the point load of a stabilizer or leveling jack so the foot does not sink into gravel, sand or soft asphalt, and it keeps the jack out of standing water. A pad roughly 10×10 inches is enough for scissor jacks; hydraulic systems need larger.
Can I just use scrap wood instead?
Plywood offcuts work in a pinch but split under repeated point loads and absorb water, which leads to rot and freezing. If you use wood, choose solid hardwood or two-by pine at least 1.5 inches thick, chamfer the driving edge, and replace anything that has cracked or delaminated.
Do leveling blocks work in mud, snow and cold?
Plastic blocks get brittle below freezing and can shatter under impact, so drive on gently rather than dropping onto them. In mud or snow they sink unless you put a wide pad underneath first. Rubber pads grip better on ice, and a small mat under the stack stops slipping.