- Top Pick: Automotive Wiring Made Simple for Beginners: A Step-by-Step Guide to Understanding Car Electrical Systems, Reading Wiring Diagrams, and Troubleshooting Faults with Confidence
- Best Value: AUTO ELECTRONICS WIRING: Simplified Auto Electrical
- Premium Choice: Off Grid Solar Power Simplified: For Rvs, Vans, Cabins, Boats and Tiny Homes
Last updated: September 7, 2026
As an Amazon Associate we earn from qualifying purchases at no extra cost to you.




🛒 Best Price Today on Amazon
Prime members get fast, free shipping on everything above, plus member-only deals. New members get a 30-day free trial — cancel anytime.
Introduction
The electrical system is the most complex and most critical component of a van conversion. Done correctly, it powers your refrigerator, lights, fan, phone chargers, and laptop for days off-grid without hesitation. Done poorly, it creates fire hazards and equipment failures in the middle of nowhere. Getting it right is less about being an electrician and more about disciplined planning, correct wire sizing, and quality components. Here are the essential components and tools for building a safe, capable van electrical system — plus the design principles that keep it reliable for years.
What to Look For in Van Electrical Components
See also: Best Ways to Keep a Van Tidy on the Road • Best Cyber Monday Cologne Deals
- Proper wire sizing: Undersized wire creates resistance, heat, and fire risk. Always size wire to handle 125% of the maximum expected current draw for each circuit. Marine-grade tinned copper wire resists corrosion better than standard automotive wire in a van's humid environment.
- Fusing and circuit protection: Every circuit needs a properly sized fuse or breaker as close to the power source as possible. A quality bus bar system with individual circuit breakers makes the system safe, organized, and easy to troubleshoot.
- Component quality: Cheap inverters, charge controllers, and battery management systems fail without warning. Invest in reputable brands — Victron, Renogy, Battle Born, and Blue Sea Systems are trusted throughout the van life community.
- Serviceability: Label every wire and circuit, leave slack for future changes, and mount components where you can reach them. A tidy system is a safe system and a fixable one.
Top Picks: Best Van Electrical Components and Tools
Victron SmartSolar MPPT 100/30 Charge Controller
Victron's SmartSolar MPPT controllers are the most trusted charge controllers in the van life community. The 100/30 handles up to 400W of solar input and charges 12V or 24V battery banks with genuine MPPT efficiency that extracts 10-30% more energy from your panels than PWM controllers. Bluetooth connectivity lets you monitor charging status from your phone, and Victron's VictronConnect app provides detailed historical data on solar production. Built to last for the life of your van.
Blue Sea Systems 5025 ST Blade Fuse Block
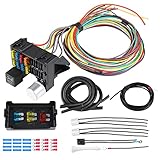
Blue Sea Systems makes the most respected marine and van electrical distribution components available. The 5025 ST Blade 12-circuit fuse block with negative bus accepts standard automotive blade fuses, clearly labels each circuit, and is built from materials that resist the corrosion and vibration that van environments produce. Paired with Blue Sea's battery disconnect switches and bus bars, it forms the backbone of a professional-quality van electrical system that's easy to troubleshoot.
Irwin Wire Stripper and Crimping Tool
Quality wire terminations require a quality stripper and crimper. Irwin's multi-function wire tool handles stripping, cutting, and crimping butt connectors and ring terminals — the three operations you perform hundreds of times during a van electrical install. The self-adjusting jaws accommodate multiple wire gauges without manual adjustment, significantly speeding up repetitive crimping tasks when running dozens of circuits. A professional-quality tool at a very reasonable price point.
How to Size Your Van Electrical System
Before buying anything, calculate your daily energy budget. List every device — fridge, fan, lights, laptop, water pump — and estimate the watt-hours each consumes per day. Sum them to find your daily consumption, then size your battery bank to store roughly two to three days of that number so a cloudy stretch doesn't leave you dead. Size your solar array to replace your daily draw plus a margin for inefficiency and short winter days. Finally, size your inverter to your largest simultaneous AC load. This top-down math prevents both the frustration of an undersized system and the wasted money of an oversized one.
The Core Components Explained
A van electrical system has a predictable anatomy. The house battery (usually lithium LiFePO4 today) stores energy. Solar panels and a charge controller refill it from the sun, while a DC-DC charger tops it up from your alternator as you drive. A fuse block and bus bars distribute power safely to each 12V circuit. An inverter converts 12V DC to household AC for laptops and appliances. A battery monitor shows your real state of charge. Understanding how these pieces connect makes the whole build far less intimidating.
Safety First: Avoiding Fire and Failure
Electrical fires in vans almost always trace back to a few avoidable mistakes: undersized wire that overheats, missing or oversized fuses that don't protect the circuit, and loose or poorly crimped connections that create resistance and heat. Protect against all three by sizing wire generously, placing a correctly rated fuse close to every power source, and making clean, tight crimps you tug-test individually. Keep an appropriately rated fire extinguisher within reach, and never bundle high-current cables against flammable insulation without protection.
Related Guides
- Camp Shower Bag Solar: Best Picks for Outdoor Bathing
- Kayak Storage for Van Life: Best Racks and Mounts for Your Van
- Best Van Life Storage Solutions: Organize Your Build 2026
- Off Road Tire Repair Plug Kit
Frequently Asked Questions
Do I need to be an electrician to wire my van?
No, but you must respect the fundamentals. Thousands of van lifers wire their own systems successfully by following proven diagrams, sizing wire and fuses correctly, and using quality components. The key is disciplined planning and not cutting corners on safety. If you're installing high-voltage shore power or feel unsure about a step, consulting a professional for that portion is money well spent.
How big should my battery bank and solar array be?
Size them to your calculated daily energy budget. Add up the watt-hours every device uses per day, then build a battery bank storing two to three days of that total for cloudy stretches, and a solar array that replaces your daily draw plus a margin for inefficiency and winter. A common full-time setup lands around 200-400Ah of lithium and 200-400W of solar, but your actual numbers should drive the decision.
What wire gauge do I need for my van build?
It depends on the current the circuit carries and the wire's length. Higher current and longer runs require thicker wire to avoid voltage drop and overheating. Size each wire to handle at least 125 percent of its circuit's maximum draw, and use a wire-gauge and ampacity chart for the specific amperage and length. When in doubt, going one size thicker is always safer than too thin.
Should I choose lithium or AGM batteries?
Lithium (LiFePO4) is now the standard for serious builds — it's lighter, lasts far longer, provides more usable capacity, and charges faster than AGM. AGM costs less upfront and can make sense for tight budgets or light use, but its shorter lifespan and limited usable depth of discharge often make lithium cheaper per usable amp-hour over time. Most full-time van lifers who can afford it choose lithium.
Where should fuses go in my system?
Place a correctly rated fuse or breaker as close as physically possible to every power source — right at the battery terminal for main cables, and at the fuse block for individual branch circuits. The fuse protects the wire from overheating if a fault occurs, so it must be sized to the wire and positioned before any long run. A fuse far from the source leaves that section of wire unprotected.
Final Thoughts
Van electrical work rewards careful planning more than any other build phase. Before buying a single wire, draw your complete system diagram — every component, every circuit, every wire gauge and fuse rating. Resources like the Will Prowse DIY Solar book and the HoboTech YouTube channel provide excellent van-specific electrical guidance. Build it right the first time; retrofitting a fully built-out van to fix electrical mistakes is one of the most painful experiences in van life.