Last updated: September 18, 2026
A van roof vent controls heat, humidity, cooking odors, and stale air, but it lives in one of the harshest places on the vehicle. Sun, rain, road vibration, tree branches, and temperature swings gradually attack the lid, sealant, screen, hinges, fan, and wiring. Learning how to maintain a van roof vent helps prevent small problems from becoming wet insulation, stained ceiling panels, mold, or an expensive roof repair.
Maintenance is mostly a careful inspection and cleaning job. The key is to work on a dry day, use products compatible with your roof and vent materials, and avoid overtightening hardware. A damaged seal can leak immediately after a rushed repair, while a clogged screen can make a perfectly good fan seem weak. The following routine works for most 14-by-14-inch RV-style vents, including basic manual models and powered reversible fans.
As an Amazon Associate we earn from qualifying purchases at no extra cost to you. Product prices and availability are accurate as of the date shown and are subject to change.

Quick answer: Our top pick in 2026 is the Soft brush or vacuum with brush attachment — our #1 rated choice. See the full ranked comparison, alternatives and buying advice below.
What You Need
| Item | Why | Optional? |
|---|---|---|
| Soft brush or vacuum with brush attachment | Removes dust, hair, pollen, and insect debris without bending the screen. | No |
| Mild dish soap and warm water | Cleans plastic, the inner screen, and the vent frame without harsh solvents. | No |
| Microfiber cloths | Dry surfaces and reveal cracks, residue, and water trails. | No |
| Phillips and flat-head screwdrivers | Remove interior trim, screen fasteners, and accessible fan hardware. | No |
| Plastic scraper | Lifts old sealant without gouging a fiberglass, aluminum, or painted roof. | No |
| Roof-compatible self-leveling lap sealant | Repairs small gaps around a horizontal vent flange. Confirm compatibility with your roof membrane. | Yes |
| Butyl tape | Useful when a vent must be removed and its mounting seal renewed. | Yes |
| Gloves, eye protection, and a stable step ladder | Protects your hands and eyes and reduces the risk of a fall. | No |
| Digital multimeter | Checks for 12-volt power at a powered fan when it will not run. | Yes |
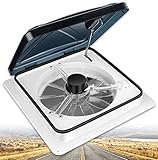
For replacement planning, a basic manual 14-by-14-inch Livpow RV or Trailer Roof Vent is listed around $59. A powered Starvent RV Roof Vent Fan with six speeds and reversible airflow is listed around $109.70. Prices vary by seller and configuration, and the cutout size, roof thickness, and wiring must match your existing installation.
Step-by-Step
See also: Best Van Water Filter for Refill Stations in 2026: Tested and Ranked • How to Winterize a Van Water System (2026): Step-by-Step
1. Choose safe weather and disconnect power (10 minutes)
Pick a dry, mild day with little wind. Do not climb onto a wet roof, and do not use a ladder on soft or uneven ground. Park on a level surface, engage the parking brake, and switch off the vent. For a powered unit, disconnect its fuse or the house-battery negative cable before removing the screen or touching wiring. If the roof is not designed for foot traffic, work from a ladder or use manufacturer-approved roof access points instead of stepping around the vent.
2. Inspect the inside of the vent (10 minutes)
Open the lid and look for daylight around the frame, water stains on the ceiling, loose trim, cracked plastic, rust, and sagging screen material. Check that the handle or crank turns smoothly and that the lid opens without binding. For a powered fan, note unusual noise, a burning smell, delayed startup, or a motor that slows at higher settings. These clues can indicate worn bearings, a failing switch, low voltage, or an obstruction.
3. Clean the screen and interior surfaces (15–20 minutes)
Remove the interior screen if the design allows it. Vacuum loose debris first, then wash the screen and frame with warm water and a small amount of mild dish soap. Use a soft brush on pollen and insect residue. Do not push hard on a fragile screen, spray water into a motor, or use bleach, ammonia, acetone, or abrasive pads on plastic. Wipe everything with a clean, damp cloth and let it dry fully.
With the power disconnected, gently clean fan blades using a barely damp cloth. Hold the blades still rather than forcing the motor to turn. A layer of dust can unbalance a blade and create vibration, but do not lubricate a sealed motor unless the manufacturer specifically calls for it.
4. Clean and examine the exterior lid and flange (15 minutes)
From a safe position, wash the lid, hinge area, and mounting flange with mild soap and water. Rinse with a damp cloth rather than directing a pressure washer at the seal. Look closely for hairline cracks, chalking, brittle corners, warped plastic, missing screws, and sealant that has separated from the roof or vent flange.
Pay special attention to the front edge, where driving rain and airflow can work underneath a deteriorated seal. Also check that the lid closes evenly. A lid that sits crooked may have a bent hinge, an obstructed track, or loose mounting hardware.
5. Test the mechanism and airflow (5–10 minutes)
Operate a manual vent several times. The crank should not skip, grind, or require excessive force. On a powered model, restore power and test every speed, both intake and exhaust directions if reversible, and any lid switch. Keep fingers, cloths, and tools away from moving blades.
Listen for rubbing or rattling and confirm that airflow direction changes as expected. Do not judge performance only by noise: a dirty screen, blocked exterior, or low battery voltage can reduce airflow without a motor fault. Disconnect power again before continuing any hands-on work.
6. Tighten hardware carefully (5–10 minutes)
Use the correct screwdriver to snug accessible screws. Tighten in a crisscross pattern and stop when the frame is secure. Do not crush the plastic flange or compress the seal until it bulges out. Over-tightening can warp the frame, create low spots where water collects, and crack older plastic. Replace stripped screws with the same diameter and a suitable length; screws that are too long can damage wiring or interior trim.
7. Repair minor sealant damage (20–30 minutes, plus cure time)
For a small, clearly visible gap, clean and dry the area first. Remove only loose sealant with a plastic scraper, then apply a thin, continuous bead of roof-compatible self-leveling lap sealant where the product instructions permit it. Keep sealant away from hinges, moving tracks, drainage channels, and the lid gasket. Follow the label’s cure time, commonly at least 24 hours, before exposing the repair to rain.
If the seal is broadly detached, cracked throughout, or leaking into the ceiling, a patch over the old material is rarely a durable solution. The vent may need to be removed, the old seal stripped, and the unit reinstalled with fresh butyl tape and compatible sealant.
8. Test for leaks after the repair (10 minutes)
Once the sealant has cured, inspect the interior ceiling and trim. If possible, have one person watch inside while another gently runs a garden hose over the vent for several minutes. Use a gentle flow, not a concentrated jet or pressure washer. Stop immediately if water appears. Dry the area and identify the entry point before resealing; water can travel along roof layers and emerge several inches from the actual gap.
Mistakes to Avoid
- Do not use a pressure washer around the vent. It can force water past a gasket and lift old sealant.
- Do not coat the entire lid or hinge with roof sealant. Moving parts need to remain free.
- Do not use silicone over incompatible old sealant without checking adhesion and roof material requirements.
- Do not run a powered fan with a blocked screen or debris touching the blades.
- Do not guess at electrical repairs. A 12-volt system can still short, melt wiring, or damage a controller.
- Do not climb onto a roof that is wet, icy, unstable, or not rated for your weight and equipment.
How Often
Inspect the vent every three months and before any long trip. Clean the screen and interior at least twice a year, or monthly if you camp near dusty roads, pollen-heavy areas, or coastal air. Check the exterior seal after severe storms, low branches, hail, or automatic washing. Powered fans deserve an airflow and noise check each season. Replace a disposable insect screen when it is torn or too distorted to sit securely.
When to Call a Pro or Replace
Call an RV technician or qualified automotive electrician if water has reached wiring, insulation, or ceiling panels; if a breaker repeatedly trips; or if you find melted connectors, scorched insulation, or voltage problems. Professional help is also sensible when the vent sits on a curved or fragile roof, the mounting opening is damaged, or the roof membrane is lifting.
Replace the vent when the lid is cracked, the frame is warped, the hinge cannot hold the lid closed, or corrosion has weakened the flange. Replacement is also reasonable when a noisy or inefficient fan needs a motor, control board, and screen at a cost approaching a new unit. Before buying, verify the rough opening—many common models use a 14-by-14-inch cutout—plus roof thickness, interior trim depth, voltage, polarity, and available roof clearance.
FAQ
How do I maintain a van roof vent without removing it?
Vacuum and wash the screen, clean the lid and flange, inspect the sealant, test the crank or fan, and snug loose hardware. Removing the vent is usually unnecessary unless the seal is failing underneath the flange or the frame is damaged.
Can I use household silicone to stop a roof-vent leak?
Usually, you should use a sealant specifically approved for your roof material and RV applications. Household silicone may adhere poorly, complicate future removal, or react with some rubber and roof membranes. Check the product label before applying anything.
Why is my powered vent running but moving little air?
Start with the screen, exterior opening, and fan blades. Dust, insect nests, a partly closed lid, low 12-volt voltage, or incorrect intake and exhaust settings can all reduce airflow. Disconnect power before cleaning the blades or inspecting wiring.
How long should a van roof vent last?
Service life varies with sun exposure, vibration, installation quality, and maintenance. Replace the unit when plastic becomes brittle, seals no longer hold, or electrical and mechanical repairs are no longer economical. A clean, protected vent can last substantially longer than one exposed to constant debris and neglected leaks.
Ready to decide? Our #1 pick for 2026 is the Soft brush or vacuum with brush attachment.
Live price & availability on Amazon.