Last updated: October 8, 2026
The best rock sliders for most vans and 4x4s are vehicle-specific steel sliders with frame-mounted brackets, an outer tube positioned just below the rocker panel, and enough clearance to avoid becoming a low-hanging skid plate; aluminum is the better choice when weight, corrosion resistance, and fuel economy matter more than repeated hard impacts.
- Quick picks by build and driving style
- Steel versus aluminum rock sliders
- Mounting method matters more than the logo
- Ground clearance, width, and step design
- Decision matrix: choosing the right construction
- How much weight will the sliders really add?
- Features worth paying for
- Ownership realities and common mistakes
- Bottom line
Quick picks by build and driving style
| Build or use case | Best slider type | Typical material and weight | Why it fits |
|---|---|---|---|
| Daily-driven 4×4 with occasional trails | Frame-mounted, bolt-on sliders with a modest step | 1.75-inch steel tube; approximately 80–140 lb per pair | Strong rocker protection without making access unnecessarily difficult |
| Rock-crawling Jeep, Toyota, or pickup | High-clearance steel sliders with angled or boat-side outer tubes | 0.188-inch wall tube or equivalent; approximately 100–180 lb per pair | Designed to slide across rocks and protect pinch seams and body mounts |
| Long-wheelbase camper van on gravel and mild trails | Reinforced steel side rails with multiple frame or subframe mounts | Approximately 90–180 lb per pair | Balances rocker protection with a useful step and support for a heavy body |
| Overland build with a strict payload limit | Structural aluminum sliders or hybrid aluminum-and-steel construction | Approximately 45–100 lb per pair | Reduces added mass, but requires careful design and less abusive driving |
| Rust-prone climate or winter-road vehicle | Powder-coated or e-coated sliders with drain holes and accessible fasteners | Steel or aluminum | Coating and maintenance matter as much as the base material |
Steel versus aluminum rock sliders
See also: Best Black Friday Ride-On Toy Deals • Best Telescopes for Astrophotography
Steel: the safer choice for repeated impacts
Steel remains the default for serious 4×4 protection. A properly designed steel slider can accept the vehicle’s weight when the rocker lands on a rock, then spread that load through several brackets into the chassis. Common construction uses 1.5- to 2-inch round or rectangular tube with roughly 0.120- to 0.188-inch wall thickness, although the bracket design is just as important as the tube.
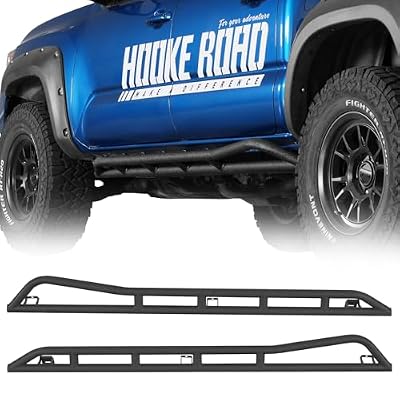
Hooke Road Tacoma Rock Sliders Kick-Out Design for 2005-2023 Toyota Tacoma Double Cab (Exclude TRD Off-Road, TRD Sport), Steel Tube Rocker Guard Nerf Bars for Rock Crawling
Included for 'Best Rock Sliders for Van and 4x4 Protection' because the listing specifies TRD Sport) and Steel Tube Rocker Guard Nerf Bars for Rock Crawling, details this guide uses to compare options.
View on Amazon
Rough Country Rock Sliders for 4-Seater 2014-2022 Polaris RZR 900/1000XP - 93065
Included for 'Best Rock Sliders for Van and 4x4 Protection' because the listing specifies 93065, details this guide uses to compare options.
View on Amazon
Hooke Road Rock Sliders Rocker Gurad Nerf Bars for 2015-2026 Chevy Colorado & GMC Canyon Crew Cab Pickup, Textured Black Steel Tubing Running Boards
Included for 'Best Rock Sliders for Van and 4x4 Protection' because the listing specifies Textured Black Steel Tubing Running Boards, details this guide uses to compare options.
View on AmazonThe disadvantages are weight and corrosion. A pair of steel sliders can add roughly 80 to 180 pounds, and a thick, poorly positioned design can reduce ground clearance. Surface chips should be touched up before rust starts, particularly around welds, mounting plates, and the underside of the tube.
Aluminum: lighter, but more dependent on engineering
Aluminum sliders can reduce pair weight by approximately 30 to 50 percent compared with a similarly sized steel design. That can be valuable on a Sprinter, Transit, Promaster, or other van already carrying water, batteries, a roof rack, and recovery equipment. Aluminum also resists red rust and generally performs well in wet or coastal environments.
However, aluminum is not automatically a lighter version of steel. It needs larger sections or carefully designed boxed structures to achieve comparable stiffness. It can deform under a concentrated rock impact, and aluminum mounting hardware must be selected to avoid galvanic corrosion where it contacts steel brackets or a steel frame. Choose aluminum when the manufacturer clearly specifies load paths, alloy, wall thickness, and mounting structure—not simply because the product is advertised as lightweight.
Mounting method matters more than the logo
Frame-mounted sliders
Frame-mounted sliders attach to the vehicle’s main frame or a structurally reinforced subframe. This is the preferred arrangement when the slider may carry the vehicle’s weight. Look for at least three well-spaced mounting locations per side, with brackets that resist both downward impact and sideways sliding forces.
On body-on-frame 4x4s, the frame is usually the correct attachment point. On unibody vehicles and vans, the situation is more complicated: a thin floor, pinch seam, or body flange may not tolerate a concentrated impact. A good van-specific system uses reinforced subframe points, large backing plates, or a load-spreading structure tied into strong chassis locations.
Body-mounted and pinch-seam sliders
Body-mounted sliders can be adequate as rock rails for light trail use, especially when they protect a vulnerable pinch seam. They are not equivalent to frame-mounted sliders unless the body structure and brackets were specifically engineered for that load. Avoid treating a cosmetic side step as a recovery point or jack point.
Weld-on versus bolt-on
- Weld-on: Often provides a clean, strong installation, but requires accurate positioning, appropriate welding procedures, and corrosion protection after fabrication.
- Bolt-on: Easier to remove and inspect, and more practical for a vehicle that may be sold or modified later. It depends on correct torque, access to the frame, and adequate fastener size.
- Hybrid installation: Some systems bolt to existing points and use optional welding for maximum rigidity. Follow the manufacturer’s instructions rather than adding welds to a heat-sensitive frame without a plan.
Ground clearance, width, and step design
The best rock sliders protect the rocker without becoming the first part to hit an obstacle. Compare the slider’s lowest point with the vehicle’s original rocker and differential clearance. A slider that hangs 3 inches below the rocker may be strong but can catch on ledges, reduce breakover clearance, and increase the risk of bending a mounting bracket.
For technical trails, an angled “boat-side” profile usually slides over rocks better than a wide, flat step. For a camper van, a modest outer tube can be more useful because it protects the lower body and provides a stable entry step. Check the step height: a rail placed 18 to 22 inches below the door sill may be convenient, while a rail positioned too low can become a mud-covered obstacle and reduce clearance.
Also check total width. A slider extending 3 to 5 inches beyond the body can protect doors and quarter panels, but it may make narrow forest roads harder to navigate. On a van, confirm that the rail does not interfere with sliding doors, running-board sensors, jacking points, fuel filler access, or aftermarket awning brackets.
Decision matrix: choosing the right construction
| Your priority | Recommended choice | Trade-off |
|---|---|---|
| Lowest purchase cost | Simple bolt-on steel rail with three or more mounts per side | More weight and usually less integrated step functionality |
| Frequent rock contact | 0.188-inch-wall steel or a comparably reinforced high-clearance design | Higher weight and possible coating damage |
| Payload is nearly maxed out | Engineered aluminum or hybrid construction | Higher price and less tolerance for severe concentrated impacts |
| Easy home installation | Vehicle-specific bolt-on kit with supplied brackets and hardware | May not be as rigid as a professionally welded system |
| Frequent use as an entry step | Steel tube with a textured top surface or replaceable step plate | Step plates collect mud and can increase width |
| Maximum clearance | High-mounted, angled slider with no broad outer step | Less convenient for entering a tall van |
How much weight will the sliders really add?
Use the actual pair weight in your payload calculation, not only the weight of the tubing. Brackets, gussets, fasteners, step plates, and protective coating are included in the installed weight. For example, if a van has 600 pounds of available payload and a 125-pound steel slider kit is installed, 21 percent of that remaining capacity is consumed:
125 ÷ 600 × 100 = 20.8 percent
That leaves 475 pounds for passengers, water, food, recovery gear, and other additions. If the same design is replaced with a 70-pound aluminum or hybrid kit, the saving is 55 pounds—useful, but not enough to compensate for an overloaded water system or roof rack. Weigh the finished vehicle at each axle after installation, especially when the slider includes a substantial step or rear extension.
Features worth paying for
- Vehicle-specific fitment: The brackets should match the exact wheelbase, body style, drivetrain, and door configuration.
- Multiple load-spreading mounts: Long vans need support distributed along the rail rather than only at the front and rear.
- Replaceable outer tubes or step plates: A sacrificial component can be cheaper than replacing the entire slider after repeated contact.
- Drainage and access: Tubes should not trap water, mud, or road salt against the chassis.
- Jack compatibility: If you intend to lift from the slider, the manufacturer must explicitly approve that use.
- Clearance around vulnerable systems: Check brake lines, wiring, fuel lines, exhaust components, and factory jack points before drilling or welding.
Ownership realities and common mistakes
The coating usually wears first, especially on the underside and the leading edge. Inspect sliders after every serious trail day for crushed tubing, cracked welds, bent brackets, loose bolts, and water trapped behind mounting plates. A slider can look straight while a bracket has started tearing away from the chassis.
Rinse mud and salt from the top, underside, and frame interface. Touch up chipped steel with a compatible rust-inhibiting coating after the surface is dry. Do not seal drainage holes with undercoating. On bolt-on systems, recheck fastener torque after the first few trips and periodically thereafter, using the supplied specifications.
Common installation errors include mounting the rail too low, using undersized backing washers, drilling through a non-structural floor, blocking a sliding door, and assuming a cosmetic step can support a hi-lift jack. Another mistake is selecting a slider based only on tube diameter: a smaller tube with excellent bracing and high frame placement may protect better than a large tube attached to weak sheet metal.
Bottom line
Choose frame-mounted steel sliders for hard trail use, repeated rock contact, and conventional body-on-frame 4x4s. Choose a properly engineered aluminum or hybrid system when a van’s payload, corrosion exposure, or fuel economy makes every pound important. For most camper vans, the ideal compromise is a high-mounted, vehicle-specific steel slider with several chassis attachment points, a moderate-width step, drainage, and enough clearance to protect the rocker without becoming the vehicle’s lowest component.